This past week I started playing around with Azure Functions. They offer an inexpensive way to get started with microservices and serverless architecture in Azure.
Essentially, they allow the developer to write small, loosely coupled services using infrastructure that is completely maintained by the cloud service provider. There is no need to worry about scaling of your Functions or OS patching as the cloud service will handle both of these concerns for you.
Getting Started
As with most aspects of development, there are a few ways to get started with Azure Functions.
The most simple way to get started doesn't require an Azure subscription. Just head over the Azure Functions page and click the "Try if for free" button. Then click the "Webhook + API" button and choose your language (for this demo I've chosen C#). Once the setup is done you have a fully functional Webhook.
Testing Your Webhook
Prerequisite: download Postman.
At this point you can use the portal to send in HTTP requests or you can use Postman. To use the portal just click on the "Test" link to the right side of the code editor. This will then show a multi line text box that you can use to edit your request. The default shows that the function expects a name parameter. Change this to your name and in the lower right-hand click on the run button. Viola! You should see an HTTP response in the output window with the text "Hello %YourName%".
That was certainly simple, right?
Next, let's use Postman to call our "Hello" example.
First, grab the url to your function from your browser window. Just above the C# code that was generated will be a "Get Function URL" link. Click that and copy the URL to Notepad.
Open the Postman window and open a new tab. Next, change the HTTP verb to use "POST" in the dropdown. Paste in the URL to your function in the address bar in Postman.
Next, click on the Headers tab just under the URL bar. We are going to add a key of "Content-Type" and value of "application/json". This will tell Postman that we want to execute an HTTP POST to the URL of your demo function and the body will be JSON:
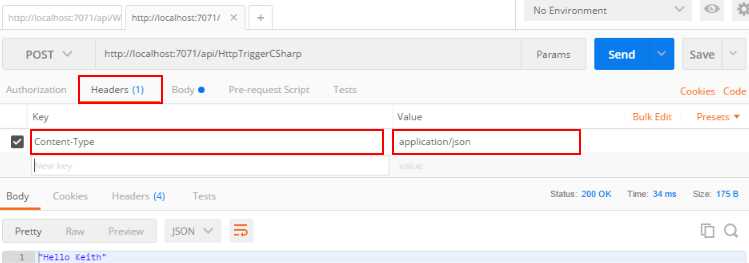
Next, click the Body tab just to the right of Headers. Click on the raw radio button just under the Body tab. Here we are going to paste our JSON.
Raw JSON
{
    "name": "Keith"
}
Next, hit the "Send" button in Postman next to the address bar and you should see the response "Hello %YourName%" just like we did earlier!
Using Your Azure Subscription
If you have an Azure subscription, another way to get started is to create a Functions App through the Azure Portal. Getting started through the Portal takes just a few clicks. Once Azure has deployed your Functions App navigate into it (if you aren't there already).
Create a new Function using the "+" button next to "Functions". There are plenty of options that show up. Choose your language (Bash, Batch, C#, F#, Javascript, Php, Powershell and Python are currently supported) and again we will make an HttpTrigger.
The steps to testing your newly created Webhook are the same as what was outlined before in Testing Your Webhook. You can execute the exact same steps to get started with integration tests.
Conclusion
While our newly created Webhook doesn't do a whole lot we have shown how easy it is to get started with Azure Functions.